Friday, December 26, 2014

NEW RECIPE: A Gluten-Free Christmas


© Constantine William Spyrou

I hope everyone had an awesome Christmas and holiday season! Our family got together for the first time in a while, and it was great to have everyone at home. Because my sister has Celiac, I was tasked with creating a gluten-free Christmas meal that could be enjoyed! This recipe contains three different dishes, each gluten-free, that I made for the dinner! 

The first recipe is a simple crab cake recipe that focuses on the crab flavor. It has a good background of traditional ingredients like spring onion, Old Bay, and the like, and is a tasty opener to the meal. 

I also made another appetizer: Indian "Arancini." Arancini are Italian risotto balls filled with meat or cheese and deep fried. This is a much healthier version, with curry-spiced rice and peas in the center. Instead of deep-frying or battering, these are simply crisped up in a pan, making them stress-free, easy to make and create, and a unique spin on an Italian classic! 

The main course was Roast Beef tenderloin with mushroom au jus and sauteed mushrooms. It went with a spiced purple sweet potato mash to bring it all together and make a tasty base for the steak! 


Recipe 1: Crab Cakes

Makes 8-10 crab cakes.

Ingredients:

1 1/2 pounds jumbo lump crab meat
1 1/2 cups bell pepper, diced (I went tricolor with this, but any bell peppers you have work fine!)
1 egg
1 cup roughly chopped green onion
1 1/2 tablespoons Old Bay seasoning
Zest and juice of 1 lemon
2 teaspoons cayenne pepper
1 tablespoon xanthan gum
1 clove minced garlic
Salt and pepper to season

Cooking/Assembling:

1. Combine all of the ingredients together for the crab cakes and form into 4-inch diameter patties at least 1/2 inch thick. You can leave these to set up in the fridge or cook with them straight away.

2. In a pan on medium-high heat, cook the crab cakes with some vegetable oil for 1-2 minutes on each side to ensure that the cakes are heated and a golden brown color is on each side. Serve!

These crab cakes are mostly crab with almost no other filler. The combination of egg and xanthan gum serves well as a binding agent while helping the Old Bay and other spices to evenly distribute throughout the crab as it is mixed, as xanthan gum with liquid does great with holding spices evenly. These are super simple to prep and cook, making them a great and tasty choice for a stress-free Christmas appetizer or entree! 


Recipe 2: Indian "Arancini"

Serves up to 8 people.

Ingredients:

2 cups arborio rice
3 cups chicken or vegetable stock
1/2 tablespoon turmeric
4 teaspoons garam masala
4 teaspoons curry powder
1/2 tablespoon vegetable oil
Salt and pepper to season
1 package frozen peas
2 teaspoons ground ginger
1 teaspoon garlic powder

Cooking/Assembling:

1. Mix together the rice, half of the garam masala and curry powder, all of the turmeric, and the vegetable oil in a rice cooker or pot. Add in the chicken or vegetable stock, and cook until all of the liquid is absorbed. The rice should be somewhat mushy and overcooked, this is on purpose to help it stick and form the rice balls.

2. In a separate pot, blanch the peas in salted boiling water for about 5-7 minutes. Drain, then mix with the remain garam masala and curry powder, along with salt and pepper to taste, the ground ginger, and the garlic powder.

3. Let the rice and the peas cool to room temperature. Then, take 3-4 tablespoons of the rice (a small scoop) and form it into a flat shape. Cup it, then place 5-6 peas in the center and form the rice around them to make a football or ball-like shape. Keep going until all of the rice is formed into balls.

4. In a pan on medium-high heat, crisp the rice balls on each side with a small amount of vegetable oil for about a minute on each side. Serve!


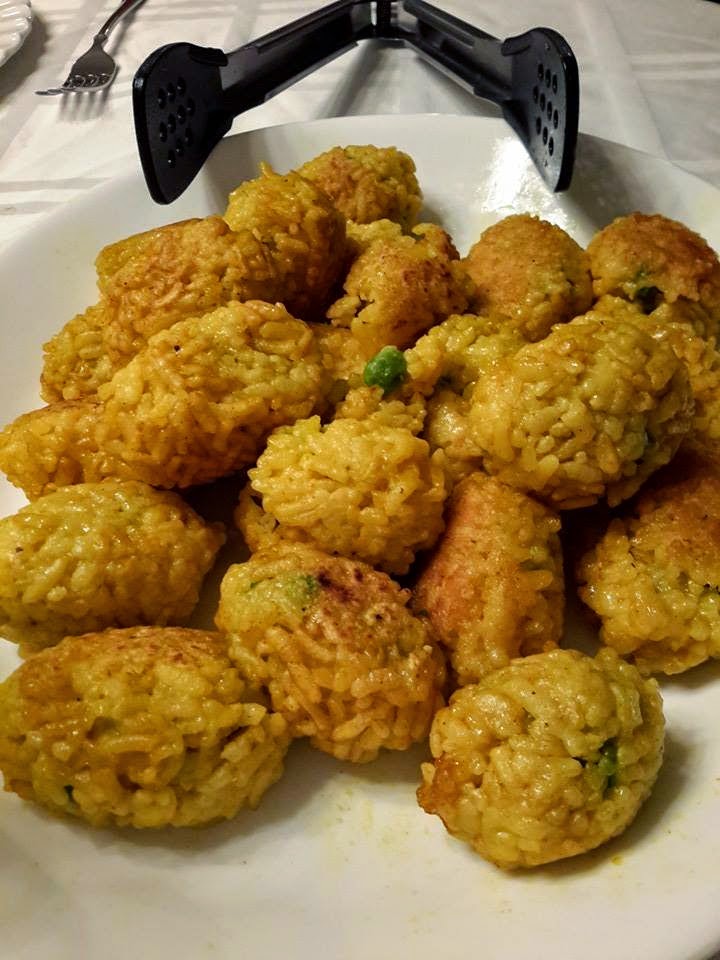
This dish took the longest overall time to prep and make, but the overall flavor is worth it! The garam masala and curry powder are two spice blends that combine to give the rice nearly 15 different spices to punch up its flavor! The stock makes a nice, rich background for the rice as well, and it being soft makes it perfect to encase the spiced peas. Once everything is cooled, the prep and cooking is super quick, making it another stress-free appetizer to add to your list! 

Recipe 3: Beef Tenderloin with Mushrooms and Purple Sweet Potato Mash

Recipe serves 4 people.

Ingredients:

3-4 pounds beef tenderloin (we went untrimmed, but its best if trimmed!)
2 purple sweet potatoes, skinned and roughly chopped
1 cup button mushrooms, finely chopped
1 cup oyster mushrooms, separated into individual stalks
1 cup chanterelle mushrooms, finely chopped
4 cups beef stock
Salt and pepper to season
2 sprigs thyme
2 cloves minced garlic
2 tablespoons grated horseradish
1 tablespoon garlic powder
1/2 tablespoon ground ginger
3 tablespoons butter, roughly chopped
Finely chopped chives for a garnish

Cooking/Assembling:

1. Place the purple sweet potatoes into salted boiling water, and cook for 15-20 minutes until they are soft.

2. Season the potatoes and mash them until smooth with a fork, adding in the butter, half of the garlic powder, and all of the ginger in the process.

3. Preheat the oven to 450 degrees F.

4. Liberally season the tenderloin with salt, pepper, and the remaining garlic powder. Place into a pan on high heat with vegetable oil and sear until golden brown on each side. Be sure to sear the top and bottom of the tenderloin as well in this step!

5. Remove the beef from the pan and place on a roasting tray. Brush with the horseradish, and give it 5 minutes to absorb the horseradish before placing it in the oven. 30-35 minutes should give it a medium-rare temperature.

6. As the beef cooks, make the mushroom gravy by sauteeing the button mushrooms with salt, pepper, and a clove of garlic. Deglaze with the beef stock, and bring up to a boil. Leave it uncovered on a medium heat for about 30 minutes or until the stock reduces by half. Strain, and transfer to a serving bowl.

7. Sautee the chanterelle and oyster mushrooms together with salt, pepper, the remaining garlic clove, and the thyme.

8. When the beef is done, let it rest for 10 minutes before carving slices. Layer some of the sauteed mushrooms over the beef slice on a plate coated with the purple sweet potato mash, and ladle a small amount of the au jus over the top. Garnish with fresh chives to balance out the flavors.


This dish is all about rich, savory flavors from the beef and mushroom. However, the sweet potato mash provides a background that makes these flavors stand out even more because of the more neutral and sweeter flavors that contrast against the rich beef and mushroom flavor. This is a great entree for Christmas or any other holiday! 

I hope you enjoyed this trio of recipes for Christmas, or any other holiday! Let me know what you think or what you would change. If you make it at home, let me know how it turns out! Enjoy, and happy holidays! =) 


Friday, December 19, 2014

NEW RECIPE: Cod and Tofu Chow Fun


© Constantine William Spyrou

One of the reasons I made this blog was to have a place to put up some of my favorite dishes. For example, I've got recipes for my favorite burger (the Greek Lucy), curried chicken, and risotto that I all love. This recipe is for one of my favorite Chinese dishes of all time: Chow Fun. 

Chow Fun is a stir-fried rice noodle dish that has soy sauce as a good base and can have plenty of other flavors added to it. In restaurants, beef chow fun is probably one of the most popular versions. However, I tried adding cod and tofu into a chow fun recently, and it was a delicious dish! I marinated the cod beforehand to really give it a lift in flavor. The tofu also took on flavor as it was cooked in the sauce, and the rice noodles brought everything together in a great-tasting and simple dish! 

Recipe serves 4 people:

Ingredients: 

1/2 pound cod fillet, cut into 1-inch cubes
1/2 pound tofu, cut into 1/2-inch cubes (the firmer the tofu, the better here. A flavored tofu like baked tofu or tofu nuggets also work great for this)
1/2 white onion, thinly sliced
2 tablespoons grated ginger
1 tablespoon minced garlic
2 teaspoons toasted sesame oil
1/2 tablespoon chopped chilis (or chili paste)
1 tablespoon rice wine vinegar
1/4 cup soy sauce
1/2 tablespoon hoisin
1/2 tablespoon Chinese Five Spice
1/2 tablespoon white pepper
1/4 cup roughly chopped green onion
2 tablespoons diamond-cut green onion (to get this cut, slice the green onions on a vertical bias to create somewhat thick shards)
1 package (about 1-1 1/2 ponds) rice noodles (I got mines fresh from an Asian market, if yours are dried, soak them in warm water for 10 minutes and drain them first)


Cooking/Assembling:

1. Combine the ginger, garlic, chili/paste, sesame oil, vinegar, soy sauce, hoisin, five spice, and white pepper in a bowl. Add in your chunks of cod, and mix. Marinate in the fridge for at least 30 minutes.

2. Add some vegetable oil to a pan on medium-high heat. Remove the cod chunks from the marinade and cook them for about 1 minute on each side to get some color.

3. Add in the onions and chopped up tofu. Cook for another 2 minutes until the onions get soft.

4. Pour in your marinade and cook for 30 seconds, stirring to combine all of the ingredients. Fold in your rice noodles, and cook for another 2-3 minutes to ensure the noodles are cooked through and the fish is done.

5. Stir in the roughly chopped green onion for 30 seconds, then plate up and serve! Garnish with the diamond-cut green onion.


This dish has a great balance of flavors to it from all of the various flavors. The cod, tofu, and rice noodles make a great base of varied textures for the saltiness of the soy, the sweetness of the hoisin, heat from the chili and ginger, as well as some garlic, five spice, and green onion notes of fragrance that liven up the dish and make it delicious! This is a great dish for the cold holiday times!

I hope you enjoyed this recipe! Let me know what you think and what you would change. If you make it at home, let me know how it turns out! Enjoy! =) 

Sunday, December 14, 2014

NEW RECIPE: White Truffle Salmon Cakes with Lemon, Pistachio, and Scallion

© Constantine William Spyrou

Finals week is upon us at this moment, and it causes a lot of stress. This may make it seem like it's impossible to cook during this time, but if you have a bunch of recipes that are very fast and can use ingredients that you can store for a while, then it makes it very easy to cook delicious food during finals week!

This is one of those recipes that I like to have. With the exception of green onion and egg, all of the food in here keeps in cupboards or in fridges for a quite a long time and is easy to remake time and time again when you're crunching on time. Here, I'm using leftover salmon to create a delicious fish cake. Canned salmon, canned tuna, or any other leftover cooked fish that you have work just as well for this, as all take on the citrus flavor very well.

Why I chose salmon for this is because this dish gains a similarity to salmon en croute as a result (which is salmon wrapped in puff pastry). It has the lightness and delicateness of the fish, but has some great crunch and balance with pistachio, green onion, and the outer crust. With just 5 minutes to prep, and then letting it sit while you study, and just another 5 to cook, this quick and easy dish to prep is a must to have! 

Recipe makes 12 salmon cakes of about 1-2 ounces each.

Ingredients:

12 ounces grilled salmon (or any other cooked/canned fish), flaked to shreds
2 tsp lemon juice
1/4 cup chopped scallions
1 1/2 tablespoons all-purpose flour
1 egg
2 tsp white truffle oil
1/4 cup roughly chopped pistachios
Salt and Pepper to season


Cooking/Assembling:

1. Combine all of the ingredients well in a mixing bowl, and form into small cakes about 1/2 inch thick and 1 inch in diameter. Cover with plastic wrap, and set into the fridge for at least 30 minutes.

2. Place each cake into a pan on medium high heat with olive oil. Cook for about 2 minutes on each side until the cakes are brown. Everything inside is cooked, so it's all about the color and heating through for this!

3. Serve with your favorite starch and fresh parsley for a quick complete meal!


Yes, even the cat likes it! (I didn't let her actually eat it, but she was smelling it for quite some time...). Anyhow, this dish has a great amount of balance because of not only textures (the smoothness and delicateness of the salmon and the crunch of the pistachio and green onion) but of the flavors (the acid of the lemon, freshness of the green onion, earthiness of the pistachio, and richness of the truffle all elevate the flavor of the salmon)! It takes so little time to make, but will make you comfortable enough to get back to studying! (Plus, fish is a brain food!)

I hope you enjoyed this recipe! Let me know what you think and what you would change. If you make this at home, let me know how it turns out! Enjoy! =) 

Saturday, November 29, 2014

NEW RECIPE: Fragrant Smoked Turkey (Happy Thanksgiving!)

© Constantine William Spyrou

I hope everyone was able to have a great Thanksgiving with family and friends! Whether you were on vacation and had a cool meal together, or got together with lots of family and massive amounts of food, I hope it was special. Thanksgiving is supposed to be a special time, regardless of where you are.

This year, our family hosted a couple of family friends over, and we had a true feast! There were stuffed pumpkins, cornbread, mashed potatoes, brussel sprouts, curried butternut squash, and more! I got to be responsible for two of the dishes: A spicy shrimp as well as the turkey! (with help from Mom of course)

I've seen barbeque restaurants smoke turkey before, and with the smoker that my dad has at home, I wanted to give it a try. To help out with the turkey flavor, I gave it a fragrant rub and a brine beforehand so that the turkey had plenty of flavor that not only would complement the smoke, but also create a brilliant flavor within the turkey! 

Recipe works for a 8-10 pound turkey.

For the Brine:

2 gallons water
1 gallon ice
1/2 cup brown sugar
1/4 cup sea salt
2 lemons, sliced
1/2 cup black pepper corns, lightly crushed
5-6 bay leaves

For the Rub:

1/2 tablespoon smoked sea salt
1 tablespoon cracked black pepper
1 tablespoon smoked paprika
1/2 tablespoon dried thyme
1/2 tablespoon lemon pepper
1/2 tablespoon sumac
1 tablespoon ground cumin seed
1/2 tablespoon ground ancho chili (chili powder also works here)

For the Turkey:

1 8-10 pound turkey
4-5 tablespoons extra virgin olive oil
1 pound apple wood chips (for smoking)
1 lemon, whole
1 medium-large yellow onion, skinned and quartered
Salt and pepper to season.

Cooking/Assembling: 

1. Combine all of the ingredients for the brine except for the ice in a large pot and bring up to a boil. Pour into a brining bucket or container with the ice in it. Once the brine has cooled in the ice, add in the turkey and leave for at least 12 hours.

2. Combine the ingredients for the rub together and sit for at least an hour to let the flavors combine.

3. The night before you are making the turkey, pat dry the turkey and season the inside of the cavity. Lift up the skin covering the breasts, and cover partially with the dry rub. Cover, and let it sit overnight.

4. The morning you are making the turkey, set up the smoker. As that is happening, remove the turkey from the fridge.

5. Season the inside of the cavity of the turkey, and stuff in the quartered onion and lemon.

6. Cover the entire outside of the turkey with the rub on both sides. Add in your olive oil and rub the turkey. This will prevent the skin from burning in the smoker.

7. Place your turkey in the smoker, and cook at an ideal temperature (around 225 degrees F) for roughly 40-50 minutes per pound. (We smoked our 8 pound turkey for 5 1/2 - 6 hours, for example).

8. Serve with all the trimmings!


This turkey gets a lot of strong flavor from the smoke and the rub on it. The onion and the lemon not only impart flavor, but also steam the turkey from the inside as well, keeping it very moist as it comes out of the smoker. All of the fat rendering out also makes this a healthier version of this Thanksgiving centerpiece!

I hope you enjoyed this recipe! Let me know what you think and what you would change. If you make it at home, let me know how it turns out! Enjoy! =) 

Thursday, November 20, 2014

NEW RECIPE: Orzo Patsitsio

© Constantine William Spyrou

If you haven't figured out by now from seeing a lot of my posts, orzo is probably one of my favorite pastas to utilize. It can take on liquid very well similar to rice, and has a cool unique toothy texture that no other pasta can achieve. I've used it in several dishes, ranging from orzo salad to spiced orzo with pork. This one is my first fusion dish involving orzo: Orzo Patsitsio.

Patsitsio is a Greek form of lasagna that involves a bechamel topping with bucatini (hollowed-out spaghetti), ground beef, and spices underneath. This form uses orzo instead that has absorbed liquid to become a thick mixture that can support the bechamel. Making the orzo in this form also gives a nice creamy element, as some of the bechamel still gets into the orzo, giving a creamy overall texture to the finished product. This orzo mix has strong Italian flavors, making it a great, comforting fusion of Italian and Greek Cuisine! 

Recipe serves up to 16 people.

For the Bechamel:

1 quart whole milk
1 whole egg
1 cup butter
1 cup flour
Salt to season
2 tsp ground nutmeg
1 tbsp parmesean cheese

For the Orzo Mix:

1 package orzo
4 cups water or vegetable stock
1 can diced tomatoes, with juice
2 tbsp tomato paste
Salt and pepper to season
1/2 cup diced white onion
1/2 cup diced celery
1/2 cup diced carrot
2 cups raw spinach or kale
1/4 cup red wine vinegar (or red wine)
1 tbsp dried basil
1 tbsp dried oregano
1 tbsp dried rosemary
2 cloves crushed garlic
1/4 cup Parmesean Cheese

Cooking/Assembling:

1. Start by making the bechamel. Melt the butter in a medium sauce pan on medium-high heat. Whisk in the flour, and stir constantly until the roux cooks out and flour can no longer be smelled, about 10-15 minutes.
2. Slowly add in your milk in small portions, whisking thoroughly to combine until smooth each time. When all of the milk is added, bring up to a boil while stirring to ensure the bechamel doesn't burn. Once the bechamel is at a boil, bring to a simmer and cook for at least 20 minutes. At this point, you can add in the salt and nutmeg.
3. Stir in the parmesean cheese. When it is all melted, beat an egg and slowly whisk it into the bechamel. Take off of the heat and let cool.
4. In a pot on high heat with some olive oil, add in your garlic, onion, celery, and carrot. Stir in the seasoning and herbs, and cook until the vegetables are soft, about 5 minutes.
5. Add in your tomato paste to the center of the pan, and cook out for a minute. Stir into the vegetables, and cook the spinach.
6. Deglaze the pot with the red wine vinegar. Add your diced tomatoes and water/stock. Bring up to a boil, then simmer for 30 minutes,
7. Bring the liquid back up to a boil, and add in the orzo. Stir on a medium heat until all of the orzo is cooked and the liquid is absorbed, ensuring that the orzo does not stick to the pot. This should take about 15-20 minutes.
8. Let the orzo cool, then preheat your oven to 375 degrees.
9. Pour your orzo into a large baking dish until it fills up half of the dish evenly. Top with your bechamel, and cover that with the remaining Parmesean cheese.
10. Bake for 30-35 minutes until the top is golden brown, and serve!


This dish is all about the comfort factor. The spinach and vegetables give some unique fun textures to the orzo base, and the rich creaminess of the top combined with the sweet, hearty tomatoes in the orzo make for a delicious combination!

I hope you enjoyed this recipe! Let me know what you think and what you would change. If you make it at home, let me know how it turns out! Enjoy! =) 

Monday, November 10, 2014

NEW RECIPE: Southern Bubble and Squeak

© Constantine William Spyrou

This recipe is one of my first to come from a recipe request! That makes me excited =). This one is for Katie Green! Thanks so much for the idea!

Katie approached me with the idea of taking leafy greens and turning them into a tasty dish. Usually, leafy greens all have very similar preparations from what I've seen: Cooked with acid either on very high heat or boiled. However, it's the perfect accompaniment to the richness of Southern southern dishes and the bold flavors that can also be found in Southern cuisines. 

This recipe takes that base collard green flavor and gives it some Southern flavor with kicks like cayenne, smoked paprika, spicy tasso ham, and a creamy potato base to take in all of the flavor. However, this is all combined in a British dish known as Bubble and Squeak! Traditionally a dish that is made to use up the leftovers potatoes and vegetables from a Sunday Roast, it can take on any flavors that you place into it! That makes this the perfect vehicle to drive the fusion of British and Southern cuisines into one dish! 

Recipe serves 4 people.

Ingredients:

3 cups collard greens, whole
1/4 cup distilled white vinegar
1 tbsp sea salt
1/4 cup cracked black peppercorns
3 bay leaves
1 pound Russet potatoes
Water to boil the kale
1/2 cup tasso ham, roughly chopped (Cappacola or another spicy cold cut also works in place)
2 tsp smoked paprika
1 tsp cayenne pepper
2 tbsp butter
2 cloves garlic, minced
1/2 cup diced onion
Salt and pepper to season

Cooking/Assembling:

1. Add your distilled white vinegar, collards, sea salt, black peppercorns, and bay leaves to a pot. Fill with water, and bring up to a boil. Turn down to a simmer for 45 minutes, then remove the collards and chop coarsely. DO NOT DRAIN THE WATER.

2. Using the same water, boil your potatoes for 15 minutes or until cooked. Add more water if needed. When cooked, crush with a fork and mix in half of the butter and some salt and pepper to taste.

3. Add the rest of your butter to a pan on medium-high heat. Once it melts, add in your onions. tasso, and garlic, and season with some salt to taste. Add in the cayenne and smoked paprika, and cook the onions until soft, about 3 minutes.

4. Add in the chopped collards, and cook for another 3 minutes, combining all of the ingredients together.

5. Add your crushed potatoes, and mix well. The end result should be a combined mixture throughout the pan. Press this into the pan and let it color for 3-4 minutes or until golden brown. Turn over and do the same thing for another 3-4 minutes.

6. Take your bubble and squeak out of the pan; it should look like a frittata almost. Cut into wedges and serve!

This dish is simple, but takes some preparation to cook down the greens into something delicious! The greens have a slightly bitter note that can be taken out with the seasoning and the rich spicyness of all of the ingredients in the bubble and squeak. They all work together to bring out the great flavor that collard greens have when cooked properly.

I hope you enjoyed this recipe! Let me know what you think and what you would change. If you make it at home, let me know how it turns out! Enjoy! =) 

Sunday, October 26, 2014

NEW RECIPE: Barley Risotto with Crab, Peas, and Seared Scallops

© Constantine William Spyrou

A lot of people are scared of cooking what is known as some of the "tougher" dishes in culinary. These include dishes like souffles, Beef Wellington, and risottos. However, each of these dishes can be accomplished with the right amount of patience and practice. Risotto is a great example of this. It seems challenging to pull of this dish, but with an hour of spare time and a lot of patience for it to cook, anyone can turn rice into this amazing, luxurious dish.

However, it doesn't just have to be rice in a risotto. Over this past week, I've been testing out different so-called "ancient grains" in risotto. This up-and-coming trend in food involves the usage of more of the older grains that people in earlier times would eat, such as barley, farro, and freekah. From my "research," I've concluded that out of these, my personal favorite to utilize in a risotto is pearl barley. It has a similar shape and size to arborio rice but with a lot more nutrients and texture. Utilizing it in a risotto just perfectly contrasts the creaminess and luxuriousness of it. It's also kind of like fried zucchini as in you can say you're eating "healthy" when you make it. 

Lame jokes aside, this risotto is a seafood risotto that capitalizes on the sweetness of crabs, peas, and seared scallops to counterbalance the richness of the risotto. The result is an amazing combination of flavors and textures! 

Recipe serves 1 person.

Ingredients:

1/2 cup pearl barley
1 finely chopped shallot
1/4 diced onion
3-4 cups water/chicken stock/vegetable stock
1 clove minced garlic
2 tablespoons mascarpone cheese
1/2 tablespoon parmesean cheese
2 tsp lemon juice
1/2 tablespoon dried thyme leaves
1 cup frozen peas (leave frozen until the risotto is done!)
1/4 cup lump crab meat (dungeness is my personal choice for this, but any crab will work)
3 sea/diver scallops
Salt and pepper to season

Cooking/Assembling:

1. Add your chopped shallots, onion, and garlic to a pan on medium-high heat with half a tablespoon of olive oil. Season and add in your thyme, and saute for 2-3 minutes until the onions are soft.
2. Add in your barley and stir for about a minute. Deglaze the pan with half of your lemon juice, then start adding in your liquid, half a cup to a cup at a time.
3. Each time you add in liquid, continously stir until the liquid comes up to a boil and is 90-95% absorbed by the rice. Then, add in your next portion of liquid, and repeat. Continue until the barley is cooked and the grains are no longer white in the center, about 40-45 minutes.
4. After adding in the last amount of stock, stir in your mascarpone and parmesean, and season to taste.
5. Stir in the crab, then turn the gas off and stir in the frozen peas. As it cools on the burner, the peas will defrost but not gum up and turn to mush.
6. While the risotto cools, cook your scallops. Season lightly on each side, and place into a pan on medium heat with some olive oil. Cook for no more than 90 seconds on each side.
7. Add in your remaining lemon juice, and toss the scallops in the lemon juice and remaining olive oil for 20-30 seconds. Take off of the heat.
8. Plate your risotto in a flat circle, and lay the scallops on top. Serve!


This is a double whammy of luxury, with the amazing freshness and sweetness of large scallops and the richness of the risotto. The thyme, seafood, lemon, and peas serve to bring the two element of the dish together by creating a bridge to the sweetness of the amazing scallop meat. Meanwhile, the risotto has an amazing rich backdrop of flavor that is highlighted by the mascarpone and will make you want more! 

I hope you enjoyed this recipe! Let me know what you think and what you would change. If you make it at home, let me know how it turns out! Enjoy! =) 

NEW RECIPE: Mongolian Lamb Shanks

© Constantine William Spyrou

There's been a very lamby theme to these past couple of dishes. That isn't necessarily by design, but being Greek, my love for lamb is huge, so cooking it in any form is always a treat. That me really happy this weekend at home. With the parents out of town, my mom left behind half a dozen lamb shanks and asked me to make something Mongolian-themed. 

Mongolian cuisine is quite similar to Chinese cuisine in terms of ingredients, but more like Thai cuisine in terms of style. It goes for a balance of the five flavors like Thai food does, but a lot more fermented products and sauces are used in comparison to the freshness of Thai dishes. This makes it a lot more optimal for braising because the sauces can reduce and enrich in flavor, whereas fresher ingredients would break down and give off undesirable flavors. 

This dish takes lamb shanks to a Mongolian side while still holding true to the Italian style of braising that the lamb shank is known for. The result is a rich flavor that can't be compared to in any other type of dish in my opinion. For best results, serve the shanks with rice that you cook in some of the extra braising liquid. It will take on the flavors just as well and make it amazing! 

Recipe serves 6 people.

Ingredients:

6 lamb shanks
1 1/2 cups soy sauce
1 cup ginger, roughly chopped
3 cups carrots, roughly chopped
2 tbsp sesame oil
2 cups Passata tomato puree (very loose)
4 cups vegetable stock
1 1/2 tablespoons Chinese 5 spice
1/2 tablespoon ground coriander
2 tablespoons white sugar
1/2 tablespoon dried chili flakes
1 cup hoisin sauce
1/4 cup rice wine vinegar
1 Tbsp sweet soy sauce
1 tbsp Chili bean paste
3 cloves minced garlic
Pepper to season (There's enough salt in the soy sauce already)

Cooking/Assembling:

1. Marinate the lamb shanks in all but 2 tbsp of the soy sauce, half of the sesame oil, all of the ginger, 5 spice, coriander, sugar, garlic, and chili flakes. Mix well and let sit in the fridge overnight for the flavors to develop.
2. Add some vegetable oil to a large hot pan. Make sure the pan you use has some depth to it (unless you are using a Crockpot/slow cooker for this dish). Sear the lamb shanks for about 2 minutes on each side, then remove from the pan.
3. While the lamb shanks are searing, place your vegetable stock in the marinade container and mix in all of the ingredients from the marinade.
4. After the lamb shanks are done, add carrots to your empty pan, along with the remaining sesame oil and the chili bean paste. Cook for 2 minutes, then deglaze the pan with your soy sauce, rice wine vinegar, sweet soy sauce, and hoisin.
5. Add in your chicken stock mix and tomato puree, then bring up to a boil. At this point, if you are using a CrockPot/slow cooker, place the lamb shanks in then cover with the liquid and turn on high for at least four hours. If not, simply add the lamb shanks back into the pan, and slightly cover. Bring down to a simmer for four hours.
6. Take the lamb out of the liquid. Serve with your starch of choice and some braising liquid over the top, as it makes an amazing sauce.

Lamb shanks in the slow cooker. Sorry it's messy.

This dish definitely has a lot going on, but everything contributes to getting a rich balance of flavors and intensity of the lamb. The lamb does a great job taking on all of the flavors, and it really does taste like a braised lamb shank from Italy- but with a spiced Mongolian kick.

I hope you enjoyed this recipe! Let me know what you think and what you would change. If you make it at home, let me know how it turns out! Enjoy! =) 

Thursday, October 23, 2014

NEW RECIPE: Smoky Black Cumin Stir-fried Lamb with Minted Sticky Rice

© Constantine William Spyrou

Over this past summer, I got the opportunity to travel to Minnesota and visit the Mall of America. While there, I discovered an amazing food store chain called Vom Fass*. With several locations across the nation, this food store specializes in oils, spices, herbs, spreads, vinegars, and spirits! They have the basics, but they also carry specialized products and ones that are hard to find. You can choose how much of a product you want in increments and purchase that way so that you can get a ton of these options without breaking your budget. It's a great deal! 

I purchased 4 different ingredients for personal use while at the store: Authentic Modena Balsamic Vinegar, Black Cumin Infused Olive oil, Ras el Hanout (a Moroccan spice blend), and pink peppercorns that work great as a way to spice up your desserts with their fruity but peppery punch. I haven't gotten the chance to use all of the yet, but I did make a dish today utilizing the black cumin oil. It is strong in cumin flavor, so it punches through and lifts the dish to a whole new level!

The dish I chose to make was inspired by a Chinese dish, but is Mexican in nature. Southern China has a popular lamb dish that is stir-fried with cumin and green onion. Instead, I stir-fried my lamb with black cumin oil, smoked paprika, and some other spices that gave it a more spicy, smoky, and savory punch! With a good balance of the spices to counteract, and an aromatic punch of mint in the lamb and the rice, it has all of the complexity that a tasty lamb dish should have! 

Recipe serves up to 2 people.

Ingredients:

1 cup cooked and seasoned Jasmine Rice (or any kind of rice you have) (to make it sticky, simply add a 3/2 ratio of water to rice and a touch of oil and steam for 40-45 minutes)
8 ounces lamb flank steak, cut into small strips
1/4 cup chopped white onion
1 tsp minced garlic
1 1/2 tsp dried cumin
2 tsp black cumin olive oil
2 tsp extra virgin olive oil
1 tsp smoked paprika
1 tsp cayenne pepper
2 tsp lemon juice
2 tsp dried oregano
1/4 cup mint leaves, left whole
Salt and Pepper to season

Cooking/Assembling:

1. Season the lamb strips and set aside, uncooked.
2. Add your olive oil to a pan on medium heat. When it starts to smoke, add in the onion and garlic. Lightly season.
3. Add in your cumin, smoked paprika, cayenne, and oregano, and saute the onions for about 2 minutes.
4. Turn the gas up to medium high, and add in the strips of lamb. Cook until the lamb is colored nicely, about 3-4 minutes.
5. Deglaze the pan with lemon juice, then slightly pick at a small amount of the mint leaves to get large pieces into the pan. Toss for 30 seconds, then take off of the heat. Drizzle with the black cumin olive oil, then stir.
6. In the center of a plate, place your rice and line with the remainder of your mint leaves. Surround with the stir-fried lamb, and drizzle the deglazed sauce made from the lemon juice over it. Also pour some on top of the rice, and serve!


This dish has a ton of different aromatics contributing to it that give the perfect balance. Smoky hints are coming from the smoked paprika, while heat comes in from the cayenne. However, this is balanced out by the acidity of the lemon juice, the warmth of the cumin in two different forms, and the fragrance of the mint as it helps to refresh the palate, allowing you to get the same sensation with every single bite! 

I hope you enjoyed this recipe! Let me know what you think and what you would change. If you make it at home, let me know how it turns out! Enjoy! =) 

*Recipe not endorsed in anyway by Vom Fass, but check them out anyways cause they're awesome.

Saturday, October 11, 2014

NEW RECIPE: Orechiette "Carbonara" with Italian Sausage, Carrots, and Leeks

© Constantine William Spyrou

A lot of the time at my apartment, I enjoy cooking things that are simple but pack a lot of flavor. Over the past week, I got to try this out on one of my favorite cuisines to cook: Italian. I attempted to make a carbonara sauce for the first time over pasta.

A carbonara sauce is pretty simple to construct: The basic flavorings for it are cream, pancetta, parmesean, and an egg mixed in right at the end. On its own, its a rich and luxurious sauce. But elevating it with the sweetness of carrots and leeks and some savory sausage will make it a true treat! 

The pasta I chose for this is orechiette, which is a small, curved, lid-shaped pasta. It takes creamy and chunky sauces well because of the curved lid shape, and goes brilliantly with all of the textures at play in this dish! 

Recipe serves 4-6 people.

For the Italian Sausage:

1 pound ground pork
2 tablespoons dried oregano
1 tablespoon dried basil
1 tablespoon fennel seed
1/2 tablespoon dried rosemary
1/2 tablespoon sage
2 cloves minced garlic
1 tbsp olive oil
Salt and pepper to season

For the Carbonara:

1/2 cup chicken stock
3 oz pancetta, diced
1 leek, finely chopped
1/2 cup carrot, diced
Italian Sausage from above
1 package orechiette
1/4 cup heavy cream
1 egg
1/4 cup grated Parmigiano Reggiano (or Parmesean)
Salt and pepper to season


Cooking/Assembling:

1. Preheat the oven to 375 degrees.

2. Combine all of the ingredients for the Italian Sausage. Flatten out onto a greased cookie sheet, and bake for 10-15 minutes. Cool, and crumble into small pieces
.
3. Cook the orechiette according to package instructions in seasoned water.

4. Add the pancetta to a hot pan on medium-high heat. Cook until the fat is rendered out, about 2-3 minutes.

5. Add in the leeks and carrots, and season with salt and pepper. Saute until soft, about 6 minutes.

6. Add in the Italian Sausage and mix to combine.

7. Deglaze the pan with the chicken stock. Add in the cream, and bring up to a boil, stirring constantly to mix the sauce through the meat and vegetables thoroughly.

8. Simmer for 4 minutes, then quickly stir in the egg and remove off of the heat.

9. Mix with the orechiette, and serve!

This dish combines a large amount of flavors to get an even balance of savory, creamy, and a touch of sweetness. The egg is the binding ingredient that helps make everything rich, with the aromatics and savoryness of the sausage providing the herby notes needed to lift the leeks and carrot. The vegetables, in turn, complement the pork with the mild sweetness they provide to the dish.

I hope you enjoyed this recipe! Let me know what you think and what you would change. If you make it at home, let me know how it turns out! Enjoy! =) 

Tuesday, September 30, 2014

NEW RECIPE: Blistered Tomato Caprese

© Constantine William Spyrou

I love having the opportunity to cook with friends because it makes fun times, adventures, and tales to tell. Not to mention great food! 

Just yesterday, three of my friends and I had the first of our planned monthly cooking nights. We had plans to make sponge cake, grilled chicken, ravioli, etc. However, our plans were thrown a curveball when the power in our neighborhood went out. However, we were able to pull off variations of those dishes utilizing a firepit, some bricks, and a lot of flashlights. 

This dish was the appetizer to our adventurous meal. It's a unique spin on one of my favorite salads: Salad Caprese. Normally just fresh basil, ripe tomatoes, and fresh mozzarella, this one utilized oven-dried tomatoes instead to add some savory and extra sweet notes. Combined with the flavors of a true Modena balsamic imported from Italy, this appetizer was an amazing treat! 

Recipe serves 4 people.

Ingredients:

3 Roma tomatoes, sliced into 1/2-inch thick rounds
3 tablespoons olive oil
Salt and pepper to season
12 fresh basil leaves
12 ounces fresh mozzarella (We used small ciliegni balls for ours, but slices work as well!) 
Balsamic vinegar to garnish

Cooking/Assembling:


1. Layer the tomatoes on a baking tray and preheat the oven to 150 degrees F.

2. Drizzle the tomatoes with olive oil, then season well on both sides.

3. Bake in the oven for 4 hours. Let cool, then plate.

4. Plating can be done however you like. Here is how we did it: The tomato rounds went on the bottom. The basil leaves then rested on top of the tomato, with the mozzarella resting inside of the basil leaves.

5. Drizzle the plate with balsamic vinegar, then serve! 


This dish is super simple, but very elegant and complex. It really is the simplicity that makes it so great, because each element gets a chance to shine through in each bite - the fresh creamy mozzarella, the sweet yet savory tomato, the bite of the balsamic, and the fresh aromatic notes of the basil all combine to make a great mouthful to cherish!

I hope you enjoyed this recipe! Let me know what you think and what you would change. If you make it at home, let me know how it turns out! Enjoy! =) 


Monday, September 22, 2014

NEW RECIPE: Spiced Caramel Popcorn

© Constantine William Spyrou

It's a shame to wrap up this summer, because for me, it was one of the best summers of my life. I discovered a lot about this new field that I've begun studying - food science - and a branch within it known as culinology. I've worked with a great group of people who taught me a lot in this field, and I hope I can carry what they've taught me through the rest of my career in this industry. 

On one of my final days of my internship, I gave a presentation to my department and the company executives on my time spent there. As part of it, I made this snack to demonstrate my cooking ability as well as make something tasty. Thanks to some critique from one of the chefs, this recipe is a more updated version and works a lot better at bringing the levels of spice and flavor through the caramel. 

Recipe serves up to 12 people.

Ingredients:

1 stick butter
1 1/2 cups sugar
1 recently used vanilla bean (split open with most of the seeds removed)
1 thai chili, thinly sliced
1/2 tablespoon cinnamon
2 teaspoons nutmeg
1 teaspoon cardamom
1 pod of star anise
1 bag popped popcorn

Cooking/Assembling:

1. Place the vanilla bean, cinnamon, nutmeg, cardamom, star anise, and chili into the sugar. Mix, and let infuse for at least 12 hours.
2. Place the sugar into a large pot on medium heat. Let the sugar brown and DO NOT MIX it.
3. When about half of the radius of the sugar circle at the bottom of the pot is completely liquid, add the butter in small quantities. Stir to combine until the butter is all melted and the caramel is fully formed.
4. Add in the popped popcorn and stir well to combine. Pour onto a sheet tray, then leave to cool. Serve when cooled!


This popcorn has an interesting twist because of the heat and spice combination that gets balanced out by the sweetness and darkness of the rich caramel. Together with the popcorn, it forms a brittle that is crunchy, sweet, spicy, and tasty!

I hope you enjoyed this recipe! Let me know what you think and what you would change. If you make this at home, let me know how it turns out! Enjoy! =) 

Tuesday, September 2, 2014

NEW RECIPE: Chili-Ouzo Grilled Pork Tenderloin (Pork Four Ways, Part 4)

© Constantine William Spyrou

I'm very excited for this weekend because I get some extra time with my family and my older sister is home! To celebrate, we are having a barbecue this Monday, and I'm making the menu. Since I have four pork tenderloin pieces to work with, I wanted to do something unique with each that I think the whole family will enjoy! =)

This recipe is based off of my love of heat and ouzo. Its a common combination in dishes that Ive put on the blog before (like the Turkey Ouzo-Poblano Meatballs). In this case, I utilized chili flake with the ouzo and tied them together with the smokiness of Hungarian paprika. This marinade is extremely simple, but very delicious! This was one of the most loved pieces of meat at my family's Labor Day barbeque.

Recipe serves 4. 

Ingredients:

1/2 cup ouzo
1/2 tablespoon dried chili flake
1 pound pork tenderloin, sliced and pounded into 1/4-inch thick rounds
1/2 tablespoon Hungarian paprika
Salt and pepper to season

Cooking/Assembling:

1. Combine all of the ingredients together and let the pork marinate for at least an hour.
2. Grill on high heat for about a minute on each side, then let rest and serve! 

Wow... that had to be the shortest recipe I've ever written. Each of these four pork recipes was meant to be simple, easy, but extremely effective. The pork becomes really tender thanks to the breakdown of its tissue by the alcohol, allowing the flavors to really permeate through and make it delicious, despite having to do little to no work to make this dish! 

I hope you enjoyed this recipe! Let me know what you think and what you would change. If you make it at home, let me know how it turns out! Enjoy! =) 

Monday, September 1, 2014

NEW RECIPE: Marinara-Salsa Stewed Pork Tenderloin (Pork Four Ways, Part 3)

© Constantine William Spyrou

I'm very excited for this weekend because I get some extra time with my family and my older sister is home! To celebrate, we are having a barbecue this Monday, and I'm making the menu. Since I have four pork tenderloin pieces to work with, I wanted to do something unique with each that I think the whole family will enjoy! =)

This pork tenderloin piece got cut into pieces, lightly floured, and then simmered for a bit in a sauce consisting of marinara and salsa. It's really simple, but its also customizable and fun because you can play around and pick your favorite marinara sauce and salsa to put into it! It makes the pork incredibly rich and tender, and deepens the flavor to a whole new level! 

Recipe serves 4 people.

Ingredients:

3/4 pound pork tenderloin, cut into 1/2 inch-thick rounds
1 1/2 cups marinara sauce
2 tablespoons salsa 
1 cup flour
Salt and pepper to season

Cooking/Assembling:

1. Season each of the pork pieces and lightly cover with your flour. 
2. Sear on each side in a pan on medium high heat for a minute, then add into a pot with the marinara and salsa mixed in. 
3. Turn the pot onto a low heat and simmer for 15-20 minutes after all of the pork is added in. 


This pork dish is so quick to make, but again, it really has a deep flavor that comes from the stewing of the pork meat. It's not too spicy because there's not much salsa, but the kick really livens up the dish and brings the pork and marinara together.

I hope you enjoyed this recipe! Let me know what you think and what you would change. If you make it at home, let me know how it turns out! Enjoy! =) 

Sunday, August 31, 2014

NEW RECIPE: Ginger-Honey Glazed Pork Tenderloin (Pork Four Ways, Part 2)

© Constantine William Spyrou

I'm very excited for this weekend because I get some extra time with my family and my older sister is home! To celebrate, we are having a barbecue this Monday, and I'm making the menu. Since I have four pork tenderloin pieces to work with, I wanted to do something unique with each that I think the whole family will enjoy! =)

This recipe is an Asian spin on pork, with a heat-and-sweet combination from ginger and honey. Both of these cut into the richness of the pork and give it a new life. Check it out! =)

Recipe serves 4 people. 

Ingredients:

- 1 1/2 pound pork tenderloin
- 1/4 cup soy sauce
- 1/2 cup honey
- 2 tablespoons fresh grated ginger
- 1/2 tablespoon white pepper

Cooking/Assembling:

1. Preheat the Oven to 375 degrees. 
2. Mix together the soy sauce, honey, ginger, and white pepper in a saucepan on medium-low heat until the honey dissolves. Pour half of it over the pork, then place in the oven for 15 minutes. 
3. Cover with the remaining glaze, then cook for another 15-20 minutes. 
4. Rest for 5-10 minutes, then carve and serve!

Again, this pork tenderloin recipe is simple, but the flavor contrasts really stand out and pop because of its simplicity. The ginger and honey really get a chance to counterbalance each other as a result, making an interesting taste experience!

I hope you enjoyed this recipe! Let me know what you think and what you would change. If you make it at home, let me know how it turns out! Enjoy! =) 

Saturday, August 30, 2014

NEW RECIPE: Pork Roulade (Pork Four Ways, Part 1)

© Constantine William Spyrou

I'm very excited for this weekend because I get some extra time with my family and my older sister is home! To celebrate, we are having a barbecue this Monday, and I'm making the menu. Since I have four pork tenderloin pieces to work with, I wanted to do something unique with each that I think the whole family will enjoy! =)

This first recipe is a traditional pork roulade, which is a rolled and stuffed tenderloin. With sauteed vegetables and strong Italian flavors, it will be aromatic and delicious! =) 

Recipe will serve four people.

Ingredients:

1 1/2 pound pork tenderloin, sliced into a single, flat, sheet about 1/4-1/2 inch thick
1 1/2 cups sauteed spinach
2 cloves minced garlic
1 red bell pepper, julienned and sauteed
1 tablespoon oregano
1 cup fresh basil leaves, whole
1 tablespoon dried rosemary
2 tablespoons olive oil
Salt and pepper to season

Cooking/Assembling:

1. Preheat the oven to 375 degrees F.
2. Season the pork tenderloin well and brush with half of the olive oil. Layer all of the ingredients across the tenderloin in the following order: Basil leaves on the bottom, followed by the sauteed spinach and garlic, the sauteed bell peppers, the dried herbs, and some more seasoning with the rest of the olive oil.
3. Carefully roll up the tenderloin like a sushi roll, then tie up with butcher's string. Don't squeeze too tightly to ensure that the stuffing doesn't come out of the pork.
4. Place the roasting tray on the stove, and turn the heat on high. Add some extra olive oil to the pan, and sear the pork on all four sides. Roast in the oven for 30 minutes.
5. Untie the butcher's string, slice, and serve!

This dish is simple to prepare and make, and has a lot of great herbaciousness to cut into the density of the pork. With the sweetness of the peppers also contrasting the dense pork meat, this creates a well-balanced dish!

I hope you enjoyed this recipe! Let me know what you think and what you would change. If you make it at home, let me know how it turns out! Enjoy! =) 

Monday, August 18, 2014

NEW RECIPE: Asian Baked Tofu Roulade


© Constantine William Spyrou
Having just recently returned home for the summer has helped me return to the cooking flavors that I grew up with thanks to my mom. This predominately involves Asian-style flavors with some Middle Eastern thrown in here and there. One of the top dishes that my mom makes is a dish with teriyaki baked tofu and edamame (Japanese soybeans) sauteed together. It's a great protein-packed and healthy meal.

I decided to give my mom's recipe a spin on its head by taking the tofu and stuffing it with rice, edamame, and Asian flavors. By marinating the tofu and baking it with the stuffing inside, it creates a deep flavor that tofu normally can't achieve. 

Recipe will serve up to 4 people.

For the tofu and marinade:

1 package soft tofu
1/4 cup soy sauce
2 tablespoons honey
1 tablespoon rice wine vinegar
1 tablespoon grated ginger
1 clove minced garlic
2 teaspoons white pepper
1/2 tablespoon sesame oil
1 cup panko breadcrumbs
1 egg

For the stuffing:

2 cups cooked rice
2 cups cooked edamame
2 tablespoons soy sauce
1 tablespoon grated ginger
1/2 tablespoon ground coriander
1/2 tablespoon sesame oil
1/2 tablespoon white pepper
1 tablespoon chili paste

For the serving sauce:

1 cup vegetable stock
2 tablespoons soy sauce
2 pods star anise
1 tablespoon honey
1/4 cup roughly sliced ginger
2 cloves garlic
4 cups water

Cooking/Assembling:

1. Combine all of the ingredients for the marinade together with the tofu until fully incorporated. Let marinate for at least 30 minutes. Do the same thing with the rice mixture.
2. Bring all of the ingredients for the sauce up to a boil together, then reduce for about 10 minutes. Let cool, then strain the sauce. When ready to serve, warm back up on the stove.
3. Flatten the tofu mix out into a flat sheet about 1/2 inch thick. Cover the tofu sheet with the rice mixture, leaving space at each end to ensure none of the rice mixture is forced out.
4. Carefully roll up the tofu mixture to surround the rice, creating a Swiss-roll like pattern in the finished product. Wrap up with tinfoil to help ensure the stability of the structure, and chill for 20 minutes to further stabilize.
5. Bake at 350 degrees F for 45 minutes, then cool and serve with the sauce.

With many similar flavors going through all components of the dish, its important to have elements that stand out, like the heat of the chili in the stuffing or the aromatic notes of the star anise in the sauce. The roulade itself should have strong Asian flavors and is very reminiscent of the mother-based dish it was inspired by.

I hope you enjoyed this recipe! Let me know what you think and what you would change. If you make it at home, let me know how it turns out! Enjoy! =) 

Sunday, August 10, 2014

NEW RECIPE: Pork Chops and Gnocchi in a Parsley-Sage Butter

© Constantine William Spyrou

I'm always looking for new culinary tactics and utilizing them in interesting new dishes. At the same time, I'm tasting different new ingredients and adding new ones that I enjoy to my repertoire. One such ingredient I've recently grown to love is Italian parsley. I originally just thought of it as a boring green garnish you'd find as a standard on many different dishes. However, I've begun to appreciate its flavor a lot more recently as an individual ingredient. Its sharp aromatic notes are great for cutting the richness or density of meats. 

I decided to test the power of parsley out in a compound butter. Since I was able to locate bone-in pork chops, I used those because of their deep flavor thanks to the bones, and pork is a dense meat that likes aromatics such as parsley and sage to balance it out. I made the compound butter and also used it as part of a flavoring for gnocchi. I used storebought fresh parmesean gnocchi, but any gnocchi you have will work for this dish. 

Recipe serves 3 people.

Ingredients:

1 package gnocchi
3 bone-in pork chops
Salt and pepper to season
1 tablespoon olive oil
1 stick of butter
2 tablespoons grated parmigiano reggiano
1/4 cup fresh chopped parsley
2 sage leaves, chopped into thin ribbons
1 clove garlic
Zest and juice of 1/2 lemon

Cooking/Assembling:

1. Let the butter soften in a bowl before making the mix. Add in the chopped parsley and sage, then combine well. Then, grate the garlic and add the lemon zest, and thoroughly mix to get the liquid from the garlic mixed in as well. Season to taste, and mix once more. Refrigerate for at least an hour to let the flavors combine.

2. Slack out your pork chops to room temperature, then season to taste with salt and pepper. Ensure the seasoning sticks to the meat by lightly pushing down across the pork chops on each side to push the seasoning in.

3. Put your olive oil in a hot pan on medium high heat. Cook the pork chops for 2-3 minutes. Be sure to cook the back end by sliding each chop to the back and tilting the pan to get it cooked.

4. Turn the pork chops, and add in a tablespoon of your butter to the pan. Quickly spoon over the pork chops as it melts to ensure that the parsley and sage do not burn.

5. Cook the pork chops for 2-3 more minutes, then set aside to rest, pouring any butter in the pan over the top of the pork.

6. Bring a pot of water up to boil, season, and add some olive oil in. Cook you gnocchi to halfway to 3/4ths of the way done, then place them into a hot pan with olive oil. Turn each gnocchi over after a minute to ensure they crisp on each side.

7. Add in the compound butter, and stir to ensure all of the gnocchi are coated with the butter. Finish with lemon juice, and cook out for 30 seconds before taking the gnocchi off of the heat.

8. Grate the parmigiano reggiano over the gnocchi, and serve with your pork chops.


This dish is light and fragrant yet dense and hearty at the same time. It makes for a delicious meal with an intriguing balance of flavors that you have to check out sometime! This butter can also be used on vegetables, fish (especially salmon or trout), other pastas, and even to flavor your rice!

I hope you enjoyed this recipe! Let me know what you think and what you would change. If you make it at home, let me know how it turns out! Enjoy! =) 


Thursday, July 31, 2014

NEW RECIPE: Dolmades with Goat Cheese Dip

© Constantine William Spyrou

Even though I've made a lot of recipes here and have a ton of culinary knowledge, there's always something knew to learn. This past week, I learned how to turn goat cheese into a delicious, creamy, and thick sauce that be utilized in many areas. That gave me the idea to utilize it almost like a tzatsiki sauce. Tzatsiki is a traditional Greek yogurt sauce with cucumber, mint, lemon, and seasoning. 

I didn't want to exactly mimic the flavor of tsatziki, however, as I wanted the goat cheese to really shine through. So, I decided to use it as a balance for homemade dolmades, which are traditionally steamed in lemon juice and have a sour note. The richness and tang of the goat cheese sauce helps bring back the flavor of the dolmade and balance it.

Dolmades are also known more commonly as stuffed grape leaves. The recipe here is a version with ground beef, rice, and spices from both Greece and the Middle East. To make it vegetarian, simply remove the ground beef and parboil the rice in water and a touch of lemon juice and seasoning while mixing with everything else. 

Recipe will make 20-30 dolmades to feed 4-5 people.

For the Goat Cheese Dip:

1/3 cup chevre goat cheese (chosen for its creamy texture)
1/3 cup heavy cream
1/4 cup diced cucumbers
2 teaspoons sea salt
1 teaspoon black pepper
2 teaspoons dried oregano

For the Dolmades:

40-45 grape leaves, rinsed individually
1 1/4 pounds ground beef
2 cups uncooked white rice
1 tablespoon olive oil
1 tablespoon lemon juice ( + enough to steam the dolmades, about 2-3 cups)
Salt and pepper to season
1/2 tablespoon dried oregano
2 tablespoons diced onion
2 cloves minced garlic
2 teaspoons dill
1 teaspoon sumac
1/2 tablespoon zatt'ar spice

Cooking/Assembling:

1. Combine the ground beef, rice, olive oil, lemon juice, spices, onion, and garlic until completely mixed together. Marinate in the fridge for at least an hour to let the flavors come together.
2. Line the bottom of your pot with 5 grape leaves to keep the stuffed ones from burning.
3. Add about 1-2 ounces of the filling mixture to the rough,veined side of a grape leaf where the stem would be (most jarred grape leaves come with the stem on as a point of reference, trim it off before rolling though!) 4. Roll the grape leaf forward first to surround the filling, then tuck in the sides and finish rolling to seal the grape leaf. Layer the stuffed grape leaves as they are made into the pot.
5. Fill the pot halfway with lemon juice. Cover with another layer of 5 flat grape leaves, then weigh down a plate on top of the dolmades to apply slight pressure (about 2-3 pounds of weight should suffice at least).
6. Cover the pot and steam at a medium-low heat for 45 minutes. As the dolmades steam, make your goat cheese dipping sauce.
7. Whisk together the goat cheese and heavy cream until fully combined into a smooth, thick mixture. Add in the cucumber, salt, pepper, and oregano, and stir to combine. Serve with the steamed grape leaves.

The goat cheese dip really is the star that brings everything together for this dish. It's an amazing sauce that counteracts brilliantly with the sour yet savory notes of the grape leaves, making an all-around balanced flavor that bounces off of every part of your palate!

I hope you enjoyed this recipe! Let me know what you think and what you would change. If you make it at home, let me know how it turns out! Enjoy! =) 

Monday, July 28, 2014

NEW RECIPE: Hot Indian Spiced Elk with Broccolini

© Constantine William Spyrou

When I go grocery shopping, I'm always looking for those interesting ingredients that I've heard of but never tried, because I want to try making dishes out of them. This has led me to venture to several different food stores in a single grocery shopping trip sometimes, but it has led to some amazing results. This weekend, I was able to pickup not one, but two great ingredients that I've always wanted to test out from two different stores- savory and slightly salty curry leaves, and robust and gamey ground elk meat. I decided to make a spicy Indian-style curry dish out of the elk and curry leaves, and chose broccolini as a vegetable because... well, I had it. 

The result was an amazing dish that had a variety of textures and really deep delicious flavors. Not too spicy, but totally flavorful and delicious!

Recipe serves 2 people.

Ingredients:

2 cups broccolini, roughly chopped
2 small chilies, thinly sliced (I used thai chilies for this, but any small hot chili that is as spicy or spicier than chile de arbol works for this)
1 1/2 cups chicken stock
6 ounces ground elk
2 teaspoons garam masala
1 teaspoon garlic powder
1 teaspoon ground cardamom
1 teaspoon ground cumin
2 tablespoons curry leaves
1 tablespoon sugar
1 tablespoon heavy cream
1 tablespoon fennel seeds
1 tablespoon avocado oil (or another neutral vegetable oil)
1 cup rice to serve with

Cooking/Assembling:

1. Add your oil and fennel seeds to a hot pan on medium heat. Toast for 30 seconds, then add in the finely chopped chili. Let it cook out for about a minute.
2. Add in your ground elk in small peaces, followed by the salt, pepper, garam masala, garlic powder, cardamom, and cumin. Combine and cook until the elk is cooked through, in about 5 minutes.
3. Add in the sugar, broccolini, and curry leaves, and stir in so the sugar melts. Then, deglaze the pan with the chicken stock. Bring up to a boil, then steam for 5 minutes to help cook the broccolini.
4. Add in the heavy cream, then bring back up to a boil and cook out for about a minute. Serve over rice.


This dish is spicy but also creamy and has a ton of aromatic flavors from the garam masala, cardamom, and curry leaves. It creates a balanced feeling in the mouth thanks to the sugar taking out some of the potency of the chili (but not ruining its flavor) and the curry leaves adding a great savory note to the dish. The gameyness of the elk plays in perfectly like lamb or goat would in a traditional Indian curry.

I hope you enjoyed this recipe! Let me know what you think and what you would change. If you make it at home, let me know how it turns out! Enjoy! =)